First start guide
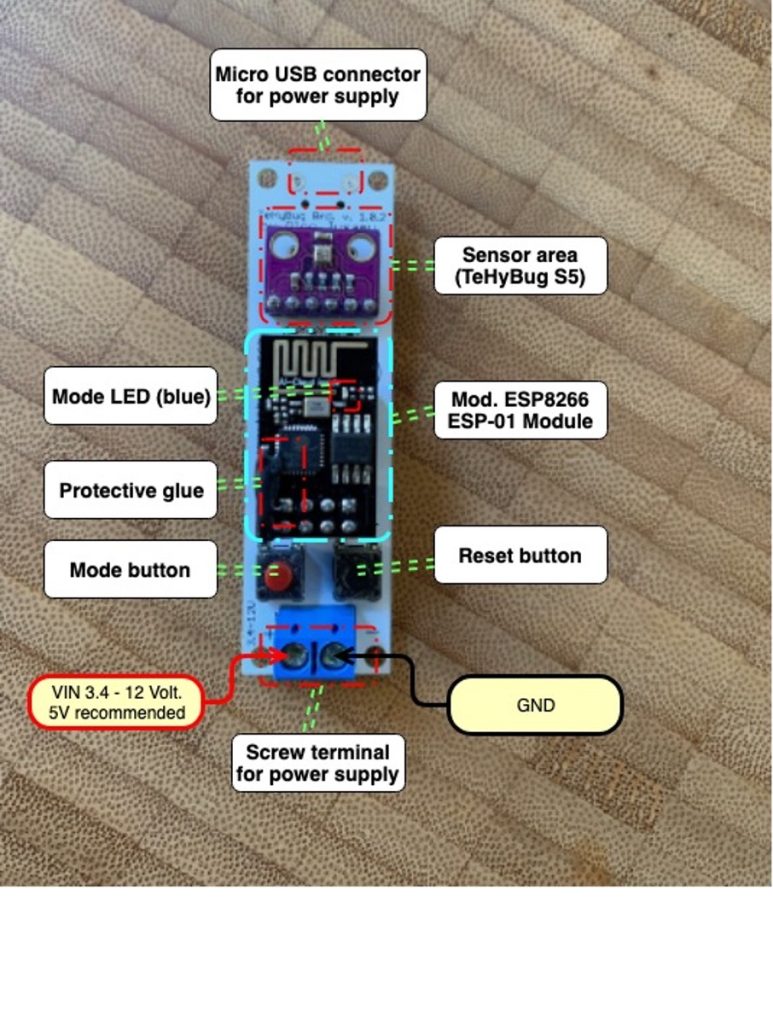
Important: You will notice black glue on the front of the ESP8266 ESP-01 module, don’t try to remove it! It protects a thin tiny wire, which enables the power-saving deep sleep mode of the chip.
Warning: TeHyBug is not protected against reverse polarity. Reverse polarity of power source will damage/burn your device. Make sure you connect the power to the screw terminal correctly.
When you connect a power supply (min 3.4V, max 12V, 5V recommended) to your TeHyBug, the blue LED on the ESP-01 module will light up solid, which means that your TeHyBug is in a configuration mode.
If you plan to use a 9V Battery make sure that the real battery voltage is below 10 Volts otherwise it will damage/burn your device.
TeHyBugs with an OLED display are already preconfigured in a „display only mode“ and are ready for use, just connect it to a power supply. If you would like to change the configuration or use some different data serving modes: you can put your TeHyBug into a configuration mode by pressing the RESET „BLACK“ button and shortly after that the MODE „RED“ button, the blue led will blink shortly and light up after 3 seconds solid.
Configuration
- Open with your computer or mobile phone a list with available Wi-Fi networks, there will be a new Wi-Fi network called TeHyBug_XXXXXX
- Connect your device to a TeHyBug Wi-Fi network.
- After your device is connected to TeHyBug Wi-Fi network, start your web browser and open this address: http://192.168.1.1/
The TeHyBug configuration webpage will open and you will have multiple multiple configuration choices.
You should start first with the Wifi configuration and provide there the Wifi Credentials of your home network.
Once the wifi configuration is saved, continue with the data serving configuration, there are several data serving choices:
Default settings if you are going to use the tehybug.com data server (signup at tehybug.com website and add your TeHyBug into your account) or custom settings where you can define the URL of any other data server.
After everything is set, you can activate the live mode and restart your TeHyBug, it should start serving the environmental data.
How to activate configuration mode manually with buttons on the board?
If you have provided incorrect Wi-Fi credentials in the configuration mode or you would like to change the settings:
Press the RESET „BLACK“ button and shortly after that press the MODE „RED“ button, the blue led will blink shortly and light up (after 3 seconds) solid, after that, you will be able to connect to a TeHyBug Wi-Fi network and change your configuration.
How to activate the live mode manually with buttons?
In case you have put your TeHyBug into a configuration mode by mistake (the blue led lights up solid) and you don’t want to change your previous settings, you can activate the live mode by pressing the RESET „BLACK“ button, and shortly after that press the MODE „RED“ button (the same way you put your TeHyBug from a live mode to a configuration mode), the blue LED will blink short (it means that you TeHyBug is in live mode, connecting to the configured Wi-Fi network and is serving the data).
Your TeHyBug has an additional Micro USB connector, so you can power it directly from a USB power supply. DO NOT use a battery and a USB power supply at the same time, it will damage your devices.
For more info’s please visit http://tehybug.com/


Leave a Reply